
Ensuring that your Ring Doorbell remains seamlessly connected to your home network is crucial. The process of how to change WiFi on Ring Doorbell is described in detail in this comprehensive guide.
We will in detail describe the steps you can use to change the WiFi network or password on your Ring Doorbell, allowing you to adapt to network updates or enhance your security. We’ll also explore how to assign your Ring Doorbell to a different WiFi network, specifically addressing the steps for both Ring Doorbell 2 and Ring Doorbell 3.
Additionally, we’ll tackle the issue of encountering no option to change WiFi on your Ring Doorbell, providing solutions to overcome this challenge. Finally, for those moments when your Ring Doorbell seems to have disconnected from WiFi and refuses to reconnect, we’ll troubleshoot common problems and offer solutions to ensure your Ring Doorbell stays connected, keeping your home safe and sound.
How to Change WiFi on Ring Doorbell
- Open the Ring Application: To get started, launch the Ring app on your mobile device.
- Access Menu: In the upper left corner of the app, you’ll see an icon with three horizontal lines. Tap on this icon to access the menu.
- Go to Devices: Within the menu, find and select the “Devices” option. This will take you to a list of all your connected Ring devices.
- Select Your Ring Doorbell Model: Identify your Ring Doorbell model in the list (whether it’s a Doorbell 2 or Doorbell 3, 3 Plus, and Elite), and tap on it to access its settings.
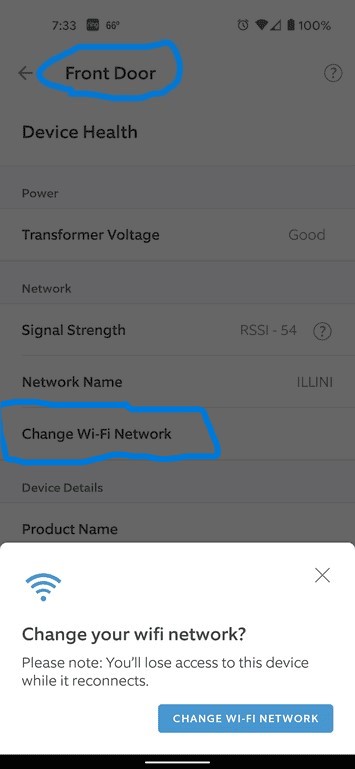
- Access Device Health: Once you’re in the settings for your specific Ring Doorbell model, scroll down and choose the “Device Health” option.
- Change Wi-Fi Network: Within the Device Health section, look for the “Change Wi-Fi Network” option and select it.
- Go to Doorbell Location: At this point, you should physically go to the location of your Ring Doorbell.
- Enter Setup Mode: Follow the on-screen instructions to put your Ring Doorbell into setup mode. This typically involves pushing a button on the device or scanning a QR code.
- Select Desired WiFi Connection: After your Ring Doorbell is in setup mode, the app will prompt you to select your desired WiFi connection from the available networks.
- Enter Network Password: Once you’ve chosen your WiFi network, you must enter the network password. Type it in carefully and then hit the “Continue” button.
How to Change Ring Wi-Fi Details (Without Removing It/ Removing the Faceplate)
Changing the WiFi details on your Ring Doorbell without removing the faceplate can be done by following these detailed steps:
- Locate the Reset Button: On the back of your Ring Doorbell, near the QR code and labels, there should be a prominent bright orange button. This button serves as the reset button, and you’ll use it to initiate the WiFi change.
- Press and Hold the Reset Button:
- Press and hold the orange reset button for approximately 10-20 seconds. You may need a paperclip or a small tool to do this.
- Keep holding it until you notice the LED on the front of the doorbell starts flashing. This indicates that the device has entered setup mode and is ready to connect to a new WiFi network.
- Use the Barcode or QR Code (Save Your Boxes):
- When you first set up your Ring Doorbell, you likely received a barcode or QR code in the packaging or setup instructions. This code contains essential information about your device.
- Ensure you have this barcode or QR code on hand, as you’ll need it during the setup process.
- Use the Same WiFi Name and Password:
- For a smoother transition, it’s advisable to set up your new WiFi network with the same network name (SSID) and password as your old one. This way, you won’t need to reconfigure all your devices.
- Use the Ring App (Device-Dependent):
- Depending on your Ring Doorbell model, you might need to use the Ring app on your mobile device to complete the setup.
- Open the Ring app and follow the on-screen instructions for adding a new device. Use the barcode or QR code mentioned earlier during this process.
- Push the Ring Reset/Setup Button:
- Once the Ring app is ready to connect your Doorbell to the new WiFi network, follow the prompts and push the reset/setup button on the back of your Doorbell again to confirm the setup process.
- Push the Button Behind the Doorbell Faceplate or On-Top the Outdoor Cam:
- If your Ring Doorbell model has a button behind the faceplate or on the top (like some outdoor cameras), press this button as part of the setup process.
How to change Ring Doorbell to Set-up Mode
Changing your Ring Doorbell to setup mode is a crucial step when you need to adjust its Wi-Fi connection. The process varies slightly depending on the specific Ring Doorbell model you have. Here’s a detailed guide for each model:
- Ring Video Doorbell:
- Start by removing the Ring Video Doorbell from its mounting bracket.
- On the rear section of the doorbell, locate the orange button.
- Gently tap this orange button. The device should now enter setup mode, indicated by a spinning white light.
- Ring Doorbell 2, 3, 3 Plus, and Elite:
- Begin by removing the faceplate of your Ring Doorbell (usually done by gently pressing the release button at the bottom).
- Look for the black button located in the front section of the doorbell.
- Give this black button a gentle tap. When it enters setup mode, you’ll notice a spinning white light.
- Ring Doorbell Pro:
- For the Ring Doorbell Pro, the setup button is located on the right side of the doorbell (when looking at it head-on).
- Simply press the button on the right side. It should enter setup mode with a spinning white light like the other models.
It is important to remember that when your Ring Doorbell is in setup mode, it is prepared to connect to a new Wi-Fi network or modify its existing connection. This step is crucial in making sure that your device remains connected and fully functional on your chosen network.
Tips when Changing the Ring Doorbell WiFi
Changing the WiFi on your Ring Doorbell or Camera is necessary if you have moved your house, you are using a WiFi extender for your Ring Camera or you have changed your WiFi router. Here are some important tips to keep in mind:
- Ensure Current WiFi Connection: Before attempting to change the WiFi network, make sure your Ring Doorbell or Camera is currently connected to your existing WiFi network. You won’t be able to change the WiFi settings without this initial connection.
- Device Reset: If you find that your Ring Doorbell or Camera is no longer connected to WiFi, it’s likely in a disconnected state. In this case, you will need to reset the device and put it into setup mode.
- Identify the Reset: Look for the specific method to reset your Ring Doorbell or Camera. This can vary depending on the model. Typically, you’ll need to press a reset button or perform a sequence of actions to initiate the reset.
- Setup Mode Indicator: Once your device is in setup mode, it should indicate this by flashing a white light. This signals that it’s ready to establish a new WiFi connection.
- Prepare for Reconfiguration: Before initiating the reset and setup process, ensure you have the necessary information for the new WiFi network. This includes the network name (SSID) and the WiFi password. Having this information on hand will make the reconfiguration smoother.
- Follow Manufacturer Instructions: Always refer to the manufacturer’s official instructions for your specific Ring Doorbell or Camera model. These instructions will provide step-by-step guidance tailored to your device.
- Patience and Testing: After configuring the new WiFi settings, give your device some time to establish the connection. Sometimes, it may take a minute or two. Once connected, test the device to ensure it’s functioning correctly.
- Security Considerations: Changing your WiFi network may impact the security of your Ring Doorbell or Camera. Be mindful of the potential security implications and update any relevant settings or passwords accordingly.
Does Ring work with 5 GHz WiFi networks?
Most Ring devices are designed to work with both 2.4 GHz and 5 GHz WiFi networks, providing users with flexibility and improved performance. This dual-band compatibility allows Ring devices to take advantage of the faster speeds and reduced network congestion offered by 5 GHz networks when available.
However, it’s important to note that not all Ring devices support 5 GHz connectivity. Some older or specific models are limited to connecting to 2.4 GHz networks only.
To ensure your Ring device is connected to the appropriate WiFi network, you can easily configure the network type through the Ring app or the device settings menu. This flexibility allows you to choose the most suitable frequency band based on your network setup and the specific capabilities of your Ring device, ensuring optimal performance and connectivity.
No option to change WiFi on your Ring Doorbell
Sometimes for some reason, you may find that there is no option to change the WiFi on your Ring Doorbell. It can be frustrating, but there are several steps you can take to troubleshoot and resolve the issue:
- Check Device Compatibility: Ensure that your Ring Doorbell model is indeed capable of changing WiFi networks. Some older or specific models may not support this feature.
- Reboot the Device: Try restarting your Ring Doorbell by disconnecting and then reconnecting its power source. Sometimes, a simple reboot can resolve minor glitches.
- Update the Ring App: Make sure you have the latest version of the Ring app installed on your mobile device. Outdated apps may not display all available options.
- Factory Reset: As a last resort, you may need to perform a factory reset on your Ring Doorbell. This will erase all settings, so use this option only if necessary. To do this, follow the manufacturer’s instructions for your specific model.
- Contact Customer Support: If you’ve exhausted all options and still cannot find the option to change WiFi, it’s advisable to reach out to Ring’s customer support for personalized assistance. They can provide guidance and troubleshoot the issue with you.
Remember that the specific steps and options may vary depending on your Ring Doorbell model and the version of the Ring app you’re using. Therefore, you can check the manufacturer’s documentation, and support resources which can be particularly helpful in resolving this issue.
Conclusion
How to change WiFi on Ring Doorbell is a manageable task, whether you need to reconfigure it to a new network or update your existing connection. By following the steps outlined in this guide, you can seamlessly transition your Ring Doorbell to a different WiFi network without the need to remove the faceplate.
Remember the importance of having your device in setup mode, using the provided QR code or barcode, and having patience as your device establishes the new connection.
Moreover, the ability of most Ring devices to work with both 2.4 GHz and 5 GHz WiFi networks underscores the company’s commitment to providing users with flexible and reliable home security solutions. This dual-band compatibility allows you to optimize your device’s performance based on your network configuration.